1 2 3 4 5 6 7 8 9 10 11 12 13
For the representation of a photorealistic scene one of the most important ingredience are images that are projected on the surfaces of the objects. The advantage of these images - called textures - is that they allow to create very sophisticated looking scenes with simple geometry since many details may be represented by the texture instead of the geometry. The first step in using textures is that we create the bitmap graphics that we want to use as texture. In principle we could use any quadratic bitmap graphic that is not bigger than a certain maximum size that depends on the OpenGL version (for example in version 1.2 this would be 256x256 pixels). This graphic must then be loaded, which could be done with the following commands:
bitmap = new Graphics::TBitmap;
bitmap->LoadFromFile("TextureName.bmp");
Unfortunately this is not yet in a format that could be handled by the OpenGL commands. To use it as texture we first have to translate it into a more OpenGL compatible format which can be done by converting the bitmap in an array of byte values:
    GLubyte bits[texturesize][texturesize][4];
    for(int i = 0; i < texturesize1; i++)
    {
    	for(int j = 0; j < texturesize1; j++)
        {
            bits[i][j][0]= (GLbyte)GetRValue(bitmap->Canvas->Pixels[i][j]);
            bits[i][j][1]= (GLbyte)GetGValue(bitmap->Canvas->Pixels[i][j]);
            bits[i][j][2]= (GLbyte)GetBValue(bitmap->Canvas->Pixels[i][j]);
            bits[i][j][3]= (GLbyte)255;
        }
    }
Each quadruple of values represent the red, green, blue and alpha value of a single pixel from the original bitmap. Now that we have the bitmap in a usable form, we must tell OpenGL how to apply the texture to the object. First we specify the alignment requirements for the start of each pixel row in memory (1 means byte-alignment, 2 means that the rows are aligned to even-numbered bytes, 4 means word alignment, and 8 means that the rows start on double-word boundaries). In principle we could now continue to set the texture parameters and then use the texture, but there is a small trick to improve the speed, if more then one texture is used. Normally loading textures slows down the program, however you can avoid this by using texture objects which work similar to display lists and where each object is identified by a single number. To create the texture object you use first the glGenTextures and glBindTexture command and before you terminate the program you have to delete the texture object with the glDeleteTextures command. Additionally we have to tell OpenGL what to do when the texture has to be magnified or minified (i.e. when the object is to big or small for the texture). Usually it is sufficient, if the corresponding filter functions GL_TEXTURE_MAG_FILTER respectively GL_TEXTURE_MIN_FILTER are set to GL_NEAREST, which returns the value of the texture element that is nearest to the center of the pixel being textured. Especially if the texture is smaller then the object we should specify, whether we would like the texture to be repeated (texture wrap set to GL_REPEAT) or clamped to the range [0,1] which is useful for preventing wrapping artifacts when mapping a single image onto an object. Now we only have to define the texture with the glTexImage2D command and then we can use the texture. The code for the texture and parameter definition should look like this:
    glPixelStorei(GL_UNPACK_ALIGNMENT, 4);
    glGenTextures(1, &texture1);
    glBindTexture(GL_TEXTURE_2D, texture1);
    glTexParameteri(GL_TEXTURE_2D, GL_TEXTURE_WRAP_S, GL_CLAMP);
    glTexParameteri(GL_TEXTURE_2D, GL_TEXTURE_WRAP_T, GL_CLAMP);
    glTexParameteri(GL_TEXTURE_2D, GL_TEXTURE_MAG_FILTER, GL_NEAREST);
    glTexParameteri(GL_TEXTURE_2D, GL_TEXTURE_MIN_FILTER, GL_NEAREST);
    glTexImage2D(GL_TEXTURE_2D, 0, GL_RGBA, texturesize1, texturesize1, 0, GL_RGBA,
                 GL_UNSIGNED_BYTE, bits);
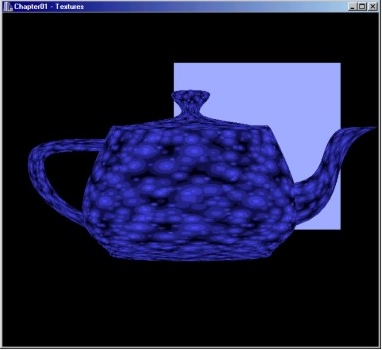
If we use one of the predefined objects from the glut library this is everything we need to do:
As we see in the image above the defined textures work for the objects from the glut library, but not for arbitrary objects. The reason is, that the predefined objects from the glut library have automatic texture coordinates, while the user created objects need manually defined texture coordinates. When we add them with the glTexCoord2f command to the rectangle code , the texture works also for the rectangle:
   glBegin(GL_QUADS);                           // draw square
      glTexCoord2f(0.0,0.0);	glVertex3f(-50.0f,50.0f, -50.0f);
      glTexCoord2f(1.0,0.0);      	glVertex3f( -50.0f, -50.0f, -50.0f);
      glTexCoord2f(1.0,1.0);      	glVertex3f( 50.0f, -50.0f, -50.0f);
      glTexCoord2f(0.0,1.0);      	glVertex3f( 50.0f, 50.0f, -50.0f);
   glEnd();
With this modification, the texture on the rectangle is also shown:

The principles shown in this section demonstrate only the absolute basics of how to apply textures. I hope the techniques shown in this section give a starting point for the application of textures, but if you plan to use textures extensively, it could help to take a look at one of the books mentioned at the end of this section to learn more about the details like mipmapping, texture priorities or automatic texture coordinates.
previous next